

Caption: A Viking 1 Orbiter mosaic image of the western hemisphere of Mars, 1980 Feb22.
The "wry smile" at the center is Valles Marineris, the largest canyon on Mars. It extends about 5000 km (almost a quarter way around the equatorial region), is about 7 km deep, and is up to 100 km wide (FMW-198).
The two most northern of the Tharsis region triplet of volcanoes are visible to the west of Valles Marineris.
Some impact crater, channels, and dark regions can also be seen.
Credit/Permission: NASA, 1980 / Public domain.
Download Site: NASA: Global mosaic of Mars centered on Valles Marineris.
Supplementary Lab Preparation: The items are often alternatives to the required preparation.
Quiz Preparation:
The quizzes in total are 40 % of the course grade.
However, only the top five quiz marks are counted.
Caption: St. Nestor the Chronicler (c. 1056--c. 1114),
St. Vladimir's Cathedral,
Kiev,
Ukraine.
At his studies.
Credit/Permission: Viktor Vasnetsov (1848--1926),
1919
(uploaded to Wikipedia
by User:Butko,
2006) /
Public domain.
Image linked to Wikipedia.
In preparing for a quiz,
go over the Required Lab Preparation.
The Supplementary Lab Preparation
(see above) could help, but is only suggested if you
feel you need more than the required Required Lab Preparation.
There is no end to the studying you can do, but it is only a short quiz.
One to two hours prep should suffice.
There will be 10 or so questions and the time will be 10 or so minutes.
The questions will range from quite easy to challenging.
The solutions might be posted at
Planets: Quiz Solutions
after the quiz is given.
Whether they are or not depends on the circumstances of each individual semester.
Caption: Plato (428/427--348/347 BCE) and
Socrates (circa 469--399 BCE) in
a Medieval image.
Here the disciple seems to be
instructing the master/mentor using the
Socratic method.
The basic pose is much like in intro labs.
Credit/Permission: Medieval artist,
Middle Ages
(probably 1000--1400)
(uploaded to Wikipedia by
User:Tomisti,
2007) /
Public domain.
Image linked to Wikipedia.
In case the weather is not good for observing, you need to have an alternate inside lab ready.
Usually, that inside lab should be from the current semester
lab schedule.
Alternatively, since the observing part of Lab 6 is relatively small,
you may just go ahead and omit the observing part altogether
or leave it for the next week.
If none of the above is feasible, yours truly suggests
Lab 16: Hubble's law since that is
pretty short and easy and takes little prep.
Someone will make an executive decision.
Your's truly---after trying everything else first---has used
the Customise page
to make Fourmilab: Your Sky
give a Las Vegas
sky map at the current time.
Fourmilab: Your Sky is a bit tricky
at first---not reading the instructions is a real hold-up---but
you can use it to get a sky map
above the horizon
for any time and place.
I didn't set all possible options on. That would make the
sky map too cluttered.
But I did click on
ecliptic-celestial equator,
planets-Moon
and constellation names.
Caption: Sky map:
Las Vegas, Nevada, current time when refreshed.
Location and time data for Las Vegas, Nevada:
The abbreviations above are explained by the following linked terms:
Pacific Daylight Time (PDT),
Pacific Standard Time (PST),
Coordinated Universal Time (UCT).
The planets are labeled by the
planet symbols:
Credit/Permission: John Walker: Fourmilab: Your Sky,
2003 /
Public domain.
Image linked to Fourmilab: Your Sky.
The C8's
usually should be sky aligned for this lab, so that the planets
to be observed stay fixed in the field of view
while the students sketch them.
The students can sketch quickly and slew
the C8's as needed.
As many C8's
as needed should be set up
and the instructors should decide ahead of time how to share them.
Caption: "Animation of a
double pendulum)
(AKA double compound pendulum)
showing chaos.
The two sections have the same length and mass, with the mass being distributed
evenly along the length of each section, and the pivots being at the very ends.
Motion computed by the
4th
order Runge-Kutta method." (Slightly edited.)
One can see the complexity of the trajectory of the motion.
In the system of the animation,
friction,
air drag,
and any other forces
(like friction inside materials)
that dissipate macroscopic
mechanical energy
(the sum of kinetic energy
and
gravitational potential energy)
to waste heat energy
have been turned off.
As a result the motion is perpetual motion
which is impossible in reality in the macroscopic world
since one can never absolutely turn off all dissipation.
One can make it very small in some cases.
So the animation
represents, an ideal limit that only be approached, but not reached,
in the macroscopic world.
The microscopic world? That takes a bit of a discussion will not give here.
The animation repeats after awhile as one can see.
So you do not see perpetual perpetual motion.
Credit/Permission:
User:Catslash,
2008
(uploaded to Wikipedia
by User:Derlay,
2010) /
Public domain.
Image linked to Wikipedia.
The smaller ones are in boxes labeled by their
focal length.
The 40 mm eyepieces should be
back on the C8's
at the end of the night and all the smaller ones in their appropriate boxes.
The smaller focal-length
eyepieces are good for viewing
and needed for the angular diameter measurements---yours truly
recommends that you do NOT
do the angular diameter measurements---just
give the students the fiducial times given below.
See CCD Camera Instructions if the
CCD camera is to be set up.
Actually, nowadays, students can take pretty good images just with their
cell phones if they want images.
You'll need one for each group---don't take more or the other lab instructors will become hostile.
You'll have to give some students a lesson in using a
protractor.
The students need to mark the positions of all the
planets on them.
Alternatively you can print out the
Your Sky
sky map
below for today's date and approximate observing time:
,
.
You will have update the time to your approximate observing time.
Caption: Sky map:
Las Vegas, Nevada, current time when refreshed.
Location and time data for Las Vegas, Nevada:
The abbreviations above are explained by the following linked terms:
Pacific Daylight Time (PDT),
Pacific Standard Time (PST),
Coordinated Universal Time (UCT).
This sky map has NO
planets marked on it.
The students will use the TheSky
to find where the planets
above the horizon are today
at the approximate observing time
and mark them on this sky map.
You will have update the time to your approximate observing time.
Credit/Permission: John Walker: Fourmilab: Your Sky,
2003 /
Public domain.
Image linked to Fourmilab: Your Sky.
Lab 6 is NOT one of those.
There are too many glitches in the manual.
At the least, the instructor should run through
Excel spreadsheet.
Caption: "Red foxes (Vulpes vulpes)
at the British Wildlife Centre,
Horne,
Surrey,
England."
(Slightly edited.)
Credit/Permission:
© Keven Law,
2008
Aug17 /
Creative Commons
CC BY-SA 2.0.
Image linked to Wikipedia.
The observing component of the lab is relatively small and can be omitted or left
for the following week if the weather conditions are not good.
The planets that are currently in the
sky
are illustrated in the sky map below.
Caption: Sky map:
Las Vegas, Nevada, current time when refreshed.
Location and time data for Las Vegas, Nevada:
The abbreviations above are explained by the following linked terms:
Pacific Daylight Time (PDT),
Pacific Standard Time (PST),
Coordinated Universal Time (UCT).
The planets are labeled by the
planet symbols:
Credit/Permission: John Walker: Fourmilab: Your Sky,
2003 /
Public domain.
Image linked to Fourmilab: Your Sky.
Nicolaus Copernicus (1473--1543)
was the first person put into the permanent record of history the
heliocentric solar system
as a well supported hypothesis.
Caption: The monument to Nicolaus Copernicus (1473--1543)
in Cracow
by Professor Cyprian Godebski (1835--1909).
Yes, Copernicus had big hair.
Credit/Permission:
© Jan Mehlich (AKA Lestath),
2008 /
Creative Commons
CC BY-SA 3.0.
Image linked to Wikipedia.
Caption: A simplified diagram of the
Copernican heliocentric model
of Nicolaus Copernicus (1473--1543)
from
De Revolutionibus Orbium Coelestium (1543).
It is not entirely as we know cosmos to be now.
For one thing---among many things---Copernicus
still had the fixed stars
pasted on
celestial sphere of the stars
that bounded a finite spherical cosmos.
This was a leftover from
Aristotelian cosmology.
Credit/Permission: Nicolaus Copernicus (1473--1543),
1543
(uploaded to Wikipedia by
User:Professor marginalia,
2010) /
Public domain.
Image linked to Wikipedia.
The natural unit
for Solar-System distances
is the astronomical unit (AU):
No one can think of Solar-System distances
in meters or miles, but in astronomical units
it is straightforward to think of those distances.
Copernicus himself first discovered the
true relative
Solar System distances in terms
of the astronomical units.
This was made possible by his adoption of a
heliocentric solar system model.
No one known to history
before Copernicus
knew what those relative distances were.
We now very little of what they knew about it though.
It is possible that they knew the relative distances too.
But they failed to put that knowledge on the permanent record of
history.
The diagram is to scale and the caption gives the mean orbital radii in
astronomical units.
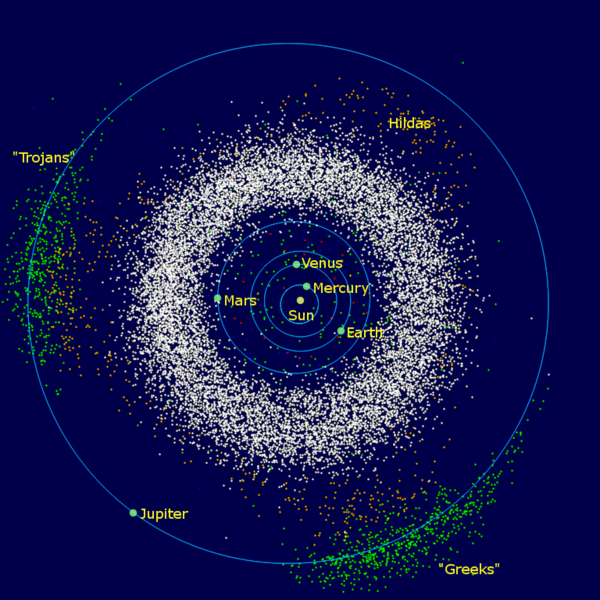
Caption: The inner Solar System
plus Jupiter
which is in the outer Solar System.
The Asteroid Belt and
Jupiter Trojan asteroids are shown.
The diagram is to scale.
This is a view from the North Pole side
of the Earth's orbital plane which, in astro-jargon,
is the ecliptic plane.
This is the customary way to view the
Solar System face-on.
The planets
and almost all asteroids orbit counterclockwise from
this perspective.
A very few asteroids
orbit clockwise which is called
retrograde motion.
The "Greeks" are the
leading
Trojans
and the "Trojans"
are the trailing Trojans---except
that 617 Patroclus got into the
"Trojan camp"
and 624 Hektor
got into the "Greek camp".
The astronomical unit (AU)
is the mean Earth-Sun
distance.
It is the natural unit
for Solar System distances---no one grasps
such distances in kilometers or
miles---but
the media keep quoting them mindlessly anyway.
In astronomical units, the
mean planet-Sun
distances are as follows:
In astronomical units,
the Solar System size scale
is comprehensible.
Credit/Permission:
User:Mdf,
2006
(uploaded to Wikipedia by
User:Dronemvp,
2007) /
Public domain
at least in USA.
Image linked to Wikipedia.
The animation below shows the
inner Solar System motions
to scale it seems.
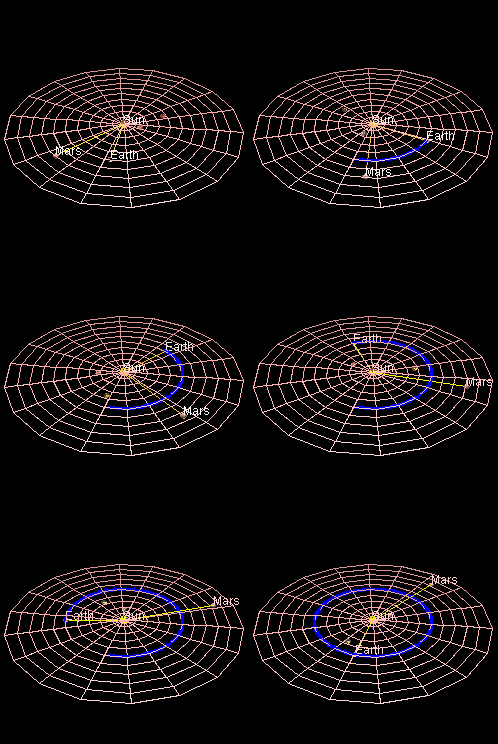
Caption: An animation of the
inner Solar System motions.
The view is onto the north side of the
ecliptic plane,
and so the planets orbit counterclockwise
which is the prograde motion direction
for the Solar System.
The planets in order from the
Sun with their
mean planet-Sun
distances in astronomical units are as follows:
Credit/Permission:
© User:Lookang,
2011 /
Creative Commons
CC BY-SA 3.0.
Image linked to Wikipedia.
The following diagram illustrates some of the jargon used
in studying
planetary configurations.
Caption: This diagram illustrates the ancient
astronomy lore of
planetary configurations.
Planetary configuration
can be defined as the apparent position of a planet
(i.e., its angular position position as see from Earth)
relative to the Sun
and the relationship of this apparent position to the 3-dimensional position of the
planet in the
Solar System.
The planetary configurations
shown are
conjunction
(inferior conjunction and
superior conjunction),
elongation
(greatest eastern elongation
greatest western elongation),
and quadrature.
The note that planets
are inferior planets---lowly, degraded
planets---if they are inward of the
the Earth's orbit and
superior planets---lordly, conceited
planets---if they are outard of the
the Earth's orbit.
The diagram omits
syzygy,
good old syzygy,
old syzygy---an alignment
of 3 astro-bodies
in a gravitationally bound system.
The diagram also omits apparent retrograde motion
which can be considered a
planetary configuration
if one stretches the termology a bit.
Credit/Permission:
© User:Wmheric,
2010 /
Creative Commons
CC BY-SA 3.0.
Image linked to Wikimedia Commons.
The lab also touches on
Kepler's 3 laws of planetary motion
which are illustrated in the figure and animation below.
Caption: The first two of
Kepler's 3 laws of planetary motion
illustrated compactly.
The 3 laws are:
This means the planets move faster the
nearer they are to the Sun.
The 3 laws also are exact
for ideal gravitationally-bound
two-body systems in the limit
of one body being infinitely massive.
ellipse
focus.
while the other body orbits obeying the
3 laws.
Credit/Permission:
© Han-Kwang Nienhuys (AKA User:Hankwang),
2007 /
Creative Commons
CC BY-SA 3.0.
Image linked to Wikipedia.
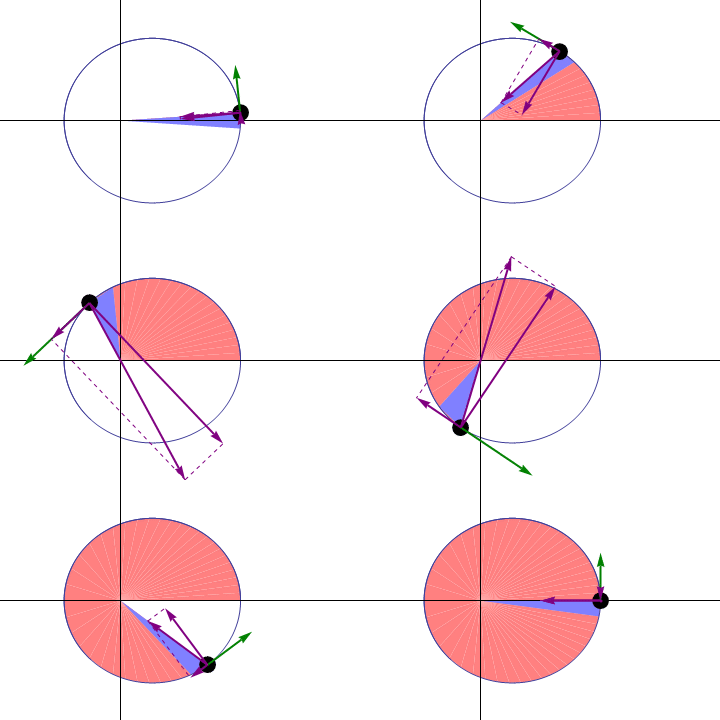
Caption: An animation of
Kepler's 2nd law of planetary motion.
This law is:
This means the planets move faster the
nearer they are to the Sun.
The other two purple arrows represent the components of the
gravitational force in the direction
of motion and perpendicular to the direction of motion.
Credit/Permission:
© Antonio Gonzalez Fernandez (AKA User:Gonfer),
2010 /
Creative Commons
CC BY-SA 3.0.
Image linked to Wikipedia.
We will be using protractors.
The figure below shows how to use a protractor.
Caption: Standard protractor.
A protractor is a divided circle used
for measuring angles.
To make a measurement, the protractor center of
rays
is centered on the
vertex of the
angle you wish to measure.
Then the angle you wish to measure is defined by
two rays that
radiate from the vertex.
The two rays go through
whatever two points you are trying to measure the
angle between from the
vertex you have chosen.
Credit/Permission:
© User:Scientif38,
2011 /
Creative Commons
CC BY-SA 1.0.
Image linked to Wikipedia.
Let's do a quick example on the board:
Now features/tips/glitches for the lab,
TheSky, and
Excel spreadsheet.
We have done the horizon once already
and once is enough for that tricky job.
See List of Tricks for TheSky if needed.
Features, etc.:
This is cheating a bit, but it helps when the instructor is clueless.
Don't worry about it.
With the Excel spreadsheet, yours truly
marks for effort.
We will NOT be doing the time period measurements.
They are too difficult without some significant practice time.
When we go outside.
You will just sketch the currently observable planets
and enter the date for the sketch.
But one additional datum is required by yours truly.
Estimate angular diameter of
the each planet in
arcseconds---just by eye.
This just an exercise in crude measurement.
The following table will help you by giving the
field of view size for comparison.
Observing Procedure:
The timing measurement specified in the lab is just too tough given the time
we have available. So omit that part.
Level the C8's,
turn off the
star pointer
laser
and the crosshairs illumination,
and turn off the
C8 power.
You have estimated the
angular diameters by eye based on the
known field of view
for whatever
eyepiece you used.
But for the Excel spreadsheet
you need timings.
Use fiducial times: t=40''/(15''/s)=2.7 s for
Jupiter and t=18''/15''/s)=1.2 s for
Saturn.
You only do
Jupiter or
Saturn, not both.
Do the one that was observed if either of them was.
The range of angular diameters for
the planets are:
Caption: Film poster for the
TheMummy (1932)
starring Boris Karloff (1887--1969).
Credit/Permission: Employee or employees of
Universal Pictures
attributed to
Karoly Grosz (fl. 1930s),
1932
(uploaded to Wikipedia
by User:Crisco 1492,
2012) /
Public domain.
Image linked to Wikipedia.
Any that are semester-section-specific will have to added as needed.
The quiz might be omitted if it's not feasible or convenient.
The students may or may not be informed ahead of time of quiz omission
depending on the circumstances.

Some of the questions will be thinking questions. You will have to reason your way
to the answers.
There may or may not be a prep quiz to
test yourself with ahead of the lab period.

Latitude 36°10'30" N = 36.17500000 N
longitude 115°08'11" W = 115.13638889
PST=UTC-8
UTC=PST+8
PDT=UTC-7
UTC=PDT+7
It's nice if they are sky aligned, but it's not absolutely essential.
See
Telescope Operating Procedure
and List of Tricks for C8 Telescopes
for procedures and tips.
 It is possible to cover all parts of the lab in one week, but be sure to decide among
the instructors how to proceed in order to avoid CHAOS on the roof.

Latitude 36°10'30" N = 36.17500000 N
longitude 115°08'11" W = 115.13638889
PST=UTC-8
UTC=PST+8
PDT=UTC-7
UTC=PDT+7

Latitude 36°10'30" N = 36.17500000 N
longitude 115°08'11" W = 115.13638889
PST=UTC-8
UTC=PST+8
PDT=UTC-7
UTC=PDT+7

He also put the planets in their correct place to 1st order
as his own illustration below shows.

1 AU = 1.49597870700*10**11 m exactly by modern definition.
The astronomical unit
is the mean
Earth-Sun
distance to very high accuracy.
Aristarchus of Samos (c. 310--c. 230 BCE)
and
Seleucus of Seleucia (fl. 150 BCE)
in Greco-Roman antiquity
were both proponents of the
heliocentric solar system model.
Below is modern diagram of the
inner Solar System
plus Jupiter.

Mercury 0.38710,
Venus 0.72333,
Earth 1.00000,
Mars 1.52369,
Jupiter 5.2028333,
Saturn 9.53876,
Uranus 19.19139,
Neptune 30.06107,
ex-planet Pluto 39.52940.


The actual planetary orbits
obey the 3 laws
to high accuracy.

A planet orbital radius sweeps out
equal areas in equal times.
In the animation, the green arrow represents the
velocity of the
planet and the middle
purple arrows represents the gravitational force on the
planet.

The easy answer is to measure the angle P (see Fig. 6.1) off your
Solar System plot,
e.g., 20,
and then just type, e.g., "=20".
    ________________________________________________________________

    Table:  C8 telescope specifications for available eyepieces
    ________________________________________________________________

    focal length  magnification     approximate
        (mm)          (X)          fields of view
                                  (arcminutes = ')
    ________________________________________________________________
         40            50               40
         25            80               30
         18           111               20
         12.5         160               14
          9           222               10
    ________________________________________________________________

Below are some generic comments for
Lab 6: Planets
that may often apply.
