- Getting prepped.
- The week of Apr21 the practice/makeup week. If you need practice after reviewing the discussion below, you should certainly come. If you are just doing practice, it shouldn't take too long. We will set some telescopes in the classroom (probably) and up on the roof---weather permitting.
- The lab final is worth 10 % of the total mark---but you must pass it (i.e., get at least 60 %) to pass the course. But it is easy to pass---show up, be reasonably prepped, and try.
- Things you will have to do are specified in the subsections below.
- Note that all the things you will have to do have to be done quickly within about 10 minutes: 5 minutes for the inside part, 5 minutes for the outside part. So you do not have time to fumble about figuring things out while you go. For most people there will be a few minutes break between the inside and outside parts.
- You should go through the steps of the preparation over and over again until they are essentially memorized.
- You are on your own. There are NO partners and the instructor will NOT be giving help or hints---or if they do have to give a hint to get you started, you will be assessed a penalty. No electronic devices, no books, and no notes. You can use a planisphere for any parts of the lab final---but other than planisphere part itself, it's not likely to be useful.
- The inside part is really easy and should be quick and is worth 70 % of the total. Since you need 60 % to pass, make sure you can do the inside part without hitches.
- On the practice night, you might try working in pairs with one student testing the other.
- Working with a planisphere: 35 %
for the CURRENT SEMESTER.
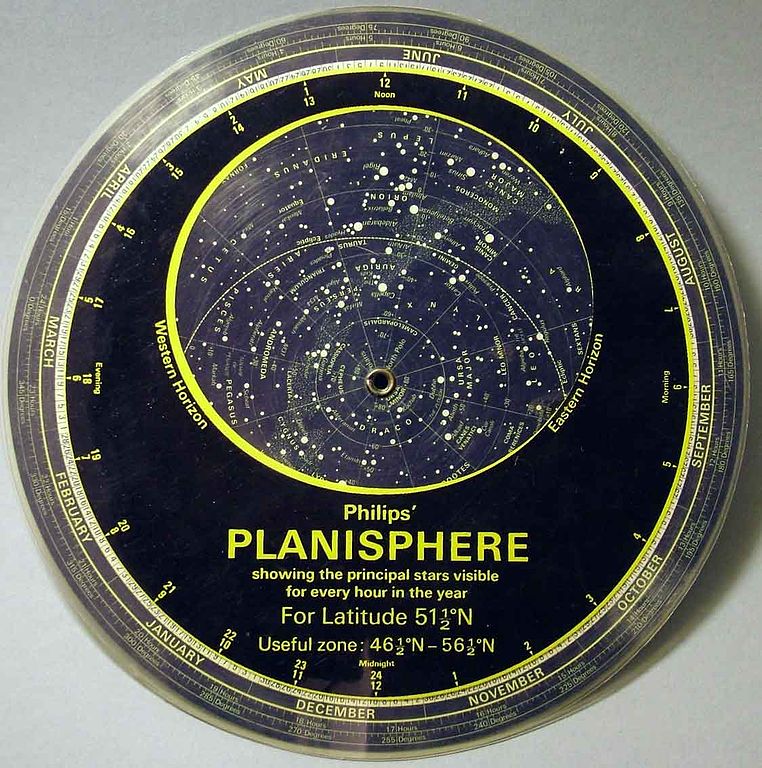
Caption: Planisphere.
The planisphere is a descendant of the ancient astrolabe.
Not all planispheres look like this, but there are basic simimilarities.
One of our astrononomy laboratory planispheres has square overlay and square base. The planispheres is usually held in "diamond" orientation, not "square" orientation, with north at the top.
On the overlay are the ordinary hours of the 12-hour clock: am on the left, pm on the right.
There is rotating circular sky map on an axis sandwiched between the overlay and the base. The axis is the north celestial pole (NCP).
The sky map has the days of year marked around its outer edge.
You rotate the sky map until, the day of the year for which you want to know the sky aligns with the clock time for which you want to observe the sky.
In the oval window of the overlay, you see approximately the sky for that day and time.
The edge of the oval is approximately the horizon.
-
North is at the top of the oval, south is at the bottom.
East is the left, west is on the right.
A day passes, objects rise on the east of the oval and set on the west.
Circumpolar objects never go below the horizon: they just rotate counterclockwise about the NCP.
Our planispheres for 40 degrees north latitude show the sky to about -50 degrees declination (dec) and to about 40 degrees below the NCP in the direction of the northern horizon (see bottom of page 4 of the instructions).
This is about right for Las Vegas, Nevada which has coordinates 36 deg 10'30" N, 115 deg 08'11" W.
Credit/Permission: © User:Wammes Waggel, 2006 / Creative Commons CC BY-SA 3.0.
Image linked to Wikipedia.
- You will set the planisphere to the test day and time.
- To do this, you rotate the circular sky map until the date on the sky map aligns with the clock time on the overlay: e.g., rotate Nov28/Apr23 to 8 pm.
- The visible sky map in the oval window is approximately the sky above the horizon on that date and time.
- Most of the constellations on the visible sky map will be in visible in the actual sky.
- You will be asked to locate 3 () of the following on the
planisphere:
Ursa Major, Ursa Minor (and Polaris), Cassiopeia, Orion (and Betelgeuse and Rigel), Canis Major (and Sirius), Taurus (and Aldebaran and the Pleiades), Milky Way, Andromeda (and the Andromeda galaxy (M31, NGC 224)), the celestial equator (a solid circle center on the NCP), and the ecliptic (a dashed circle that is tilted from the celestial equator by 23.4 degrees).
- You should be able so show how the planisphere oval window aligns with the actual sky.
- You can use the planisphere for the rest of the lab final---but it's not likely to be very useful.
- Working with TheSky software:
omitted (so 0 %) for the CURRENT SEMESTER.
- Launch the TheSky if necessary.
- Set File/Open/Normal.sky if necessary.
- Check the location is Las Vegas, Nevada with Data/Location. Change location if necessary.
- Check the time is the current date and time with Data/Time. Change date and time if necessary.
- Set to Mercator projection with View/Projections/Mercator if necessary.
- Set the TheSky to show the Moon and planets with View (or background)/Display Explorer/Solar system +/Moon X, planet X.
- Find the Moon, Jupiter, and Saturn which are CURRENT SEMESTER objects. Make sure you can locate them on the planisphere by constellation they are in.
- Locate the Pleiades in Taurus. TheSky doesn't give the name Pleiades, but gives the brightest stars in the Pleiades: Alcyone, Atlas, Electra, etc.
- Set the TheSky to show the Andromeda galaxy (M31, NGC 224) with View (or background)/Display Explorer/Non-stellar +/Galactic X (which causes Andromeda galaxy to appear as a smudge on the screen) and View (or background)/Display Explorer/Non-stellar +/Label +/Messier X (which puts the label M31 on the Andromeda galaxy) or View (or background)/Display Explorer/Non-stellar +/Label +/Common names X (which puts the label Andromeda galaxy on the Andromeda galaxy).
- Shutdown TheSky without saving changes.
- Working with telescope inside: 35 %
for the CURRENT SEMESTER.
- You will have to name and locate
the of the
C8 telescope
specified in the
Telescopes lab.
You have to rattle them off without prompting.
You should prepare by reading the relevant part of your report of the
Telescopes lab.
You will be asked for explain the function of .

Caption: A schematic diagram of a Celestron 8 (C8) telescope.
Not much good, but there seems to be nothing else online, so faute de mieux.
Credit/Permission: © David Jeffery, 2013 / own work.
- Telescope parts and other useful terms should be reviewed: air mass, angular resolution, clock drive, crosshairs, eyepiece, field of view, finderscope, focal length, focusing knob, fork arm, LCD keypad, light-gathering power, objective, on-off switch, optical telescope, optics, pimary mirror, Rayleigh criterion, SAO stars, Schmidt-Cassegrain telescope, secondary mirror, seeing, slew, star diagonal, star pointer, telescope tube.
- Working with telescope outside: 30 % for the CURRENT SEMESTER.
If weather doesn't permit this part outside, a modified version will be done inside. Check weather at National Weather Service (NWS) 7-day forecast, Las Vegas, NV
You can also check the sky with Sky map: Las Vegas, current time. To update it to the observing time, change to Universal Time (UT) and set the date and time. Remember for Las Vegas, UT=PST+8 and UT=PDT+7 hours. For example, if you want Apr30, 8 pm PDT, set to May01, 3 UT and click update.
- You should prepare by reading over your report of the Telescopes lab and Appendix D of the lab manual, and by actual practice in the practice week session.
- For slewing uses the arrow keys. They only work for slewing. The key rate determines the slewing rate. Go rate/9 for fast slewing appropriate for moving many degrees across the sky. Go rate/5 for slow slewing appropriate for centering an object.
- In working with the LCD keypad menu, remember that UNDO button moves you up the categories. Repeated UNDOs will take you to the top category NexStarSE Ready which is usually a good place to start any new set of instructions.
- You will asked to find and center . The telescope is alignment NOT perfect. So you will almost certainly have to do the precise finding and centering using the star pointer and the finderscope. Precise centering usually requires switching to a slow slew rate. When you want to slew by many degrees you have to switch back to a fast slew rate.
- The could be
the Moon,
planets
(e.g., Jupiter or
Saturn),
named stars
(e.g., Sirius,
Mizar,
or Polaris),
and named objects (e.g., the
Pleiades).
- To find a Solar System object: 5-planet/scroll/object/enter. Note scroll up is 6-Up and down is 9-down in any list of entries. Hold down 6-Up or 9-down for fast scrolling.
- To find a named star: 8-list/scroll/Named Stars/enter/scroll/object/enter.
- To find a named object: 8-list/scroll/Named Objects/enter/scroll/object/enter.
- If the alignment on the C8's
has not been set---or has been lost---the instructor will point out the objects on the sky
and the student will have to slew to them
and center on them.
- Lab Final Procedure
- The lab room will open a 7:30 pm or a bit earlier if any students are around.
- Last-minute practice with the planisphere and inside C8's.
- At 8:00 pm the lab final will start.
- Four students will be done in half-hour periods. You do not have to arrive before your scheduled period, unless you want to make use of the last-minute practice at 7:30 pm.
- The lab room will be cleared and each of the 4 students will be admitted sequentially for the planisphere and inside telescope parts. This is to be really quick: 3 to 5 minutes. Any flailing and we just move on.
- After the inside part, the instructor and students troop to the roof quickly and then simultaneously on 4 setup C8's the students each find their . They have to show the instructor that they have found them. There finite time to do this---10 minutes at most. The outside part must end at the end of the half-hour period.
- The planisphere part is worth 35 marks. This part will be marked generously. One mistake or one flailing will not cost you.
- The inside telescope part
is worth 35 marks: 20 for naming the parts and 15 for briefly describing the functions
of two parts indicated by the instructor.
Naming the parts will be marked generously.
Describing the functions will not---the instructor is expecting the main function
stated concisely.
For example of a super-perfect answer: "The
star diagonal bends the
light beam by 90 degrees from the optical axis of the
telescope using a
prism in order to
permit easier viewing."

Caption: A 1673 woodcut of a 8-inch objective (i.e., primary lens), 45-meter-long aeriel telescope constructed by Johannes Hevelius (1611-1687).
In the 17th century (which was before the achromatic lens and before the significant development of reflector telescope) chromatic aberration (the failure of simple lenses to focus all wavelengths of light in the same place) was a problem for observing. Objects of more than one color (which is most objects) were blurred.
Using a very long focal length objective greatly reduced chromatic aberration.
So very long refractor telescopes were built.
The telescope tube was eventually dispensed with since the tube is actually not required for the essential functions of the telescope. The tube provides scaffolding for the optical elements and can protect the optical elements from dust and other harms, but it serves no optical function usually. Large modern reflector telescopes generally have no tubes.
The idea for the aeriel refractor telescope is credited to Christiaan Huygens (1629--1695) and his brother Constantijn Huygens, Jr. (1628--1697) circa 1675, though others may have had the idea earlier and/or independently.
Hevelius's aeriel telescope is from earlier than 1675. Yours truly cannot say why the brothers Huygens are given primacy.
Credit/Permission: Johannes Hevelius (1611-1687) in Machina coelestis, part 1, 1673 (uploaded to by User:Marshallsumter, 2011) / Public domain.
Image linked to Wikipedia.
- The outside telescope part is worth 15 marks: 8 and 7 marks per object. This will be marked generously.
- Lab Final Schedule For Students
Note the day and time of your scheduled lab final.
Do NOT be late.
If you arrive early at 7:30, there is last-minute practice time.
- Night 1: Apr30 T, Lab Section 6
- 7:30: Last-minute practice time.
- 8:00
- Student
- Student
- Student
- Student
- 8:30
- Student
- Student
- Student
- Student
- 9:00
- Student
- Student
- Student
- Student
- 9:30
- Student
- Student
- Student
- Student
- 10:00
- Open slots, but this must be by appointment.
- 7:30: Last-minute practice time.
- Night 2: May 2 R, Lab Section 11
- 7:30: Last-minute practice time.
- 8:00
- Student
- Student
- Student
- Student
- 8:30
- Student
- Student
- Student
- Student
- 9:00
- Student
- Student
- Student
- Student
- 9:30
- Student
- Student
- Student
- Student
- 10:00
- Student
- Student
- Student
- Student
- 7:30: Last-minute practice time.
- Night 3: May T, Lab Section 6
- 7:30: Last-minute practice time.
- 8:00
- Student
- Student
- Student
- Student
- 8:30: Last-minute practice time.
- Student
- Open slots, but this must be by appointment.
- 7:30: Last-minute practice time.
- Special Instructions For Instructors
- Check as needed:
- As usual for outdoor labs, check the weather online at
NWS
7-day forecast, Las Vegas, NV in advance and
by personal visual inspection at/during the lab period.
In case the weather is not good for observing, you need to have an alternate indoor test ready. Yours truly suggests ????---well we will cross that bridge when we come to it.
- You will need to set up the
C8 telescopes
on the roof
before the lab period and review their usage well in advance if needed.
See
Telescope Operating Procedure
for procedures and tips.
- You will have to name and locate
the of the
C8 telescope
specified in the
Telescopes lab.
You have to rattle them off without prompting.
You should prepare by reading the relevant part of your report of the
Telescopes lab.
You will be asked for explain the function of .

